This is an old revision of the document!
Table of Contents
Management User Guide: Visitor Management System
1. Introduction
This guide is designed to streamline and enhance the experience of managing visitors. This user guide will help you navigate and efficiently utilize the system for optimal performance.
2. Visitor Management
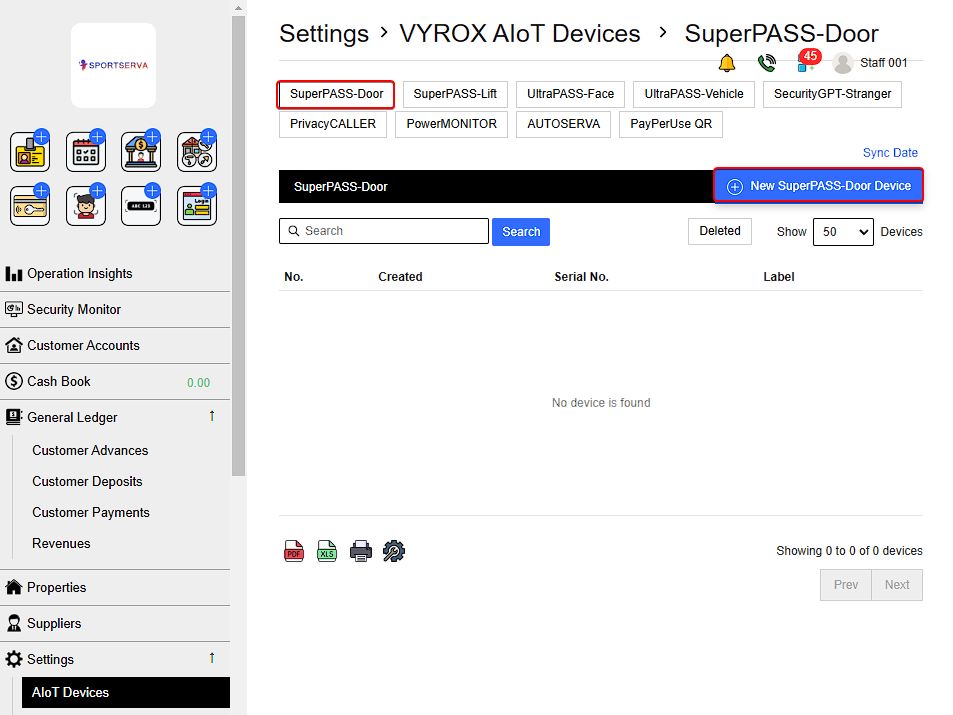
2.1. Add New SuperPASS Door Device
The SuperPASS Door Device is an advanced access control system installed at building entry points. Visitors and authorized personnel can use a card or QR code to scan and gain secure access to the building. This system ensures a smooth, contactless entry experience while maintaining high security.
To Add New SuperPASS Door Device:
Go to Settings > VYROX AIoT Devices > SuperPASS-Door > New SuperPASS-Door Device > Fill in details > Add
 |
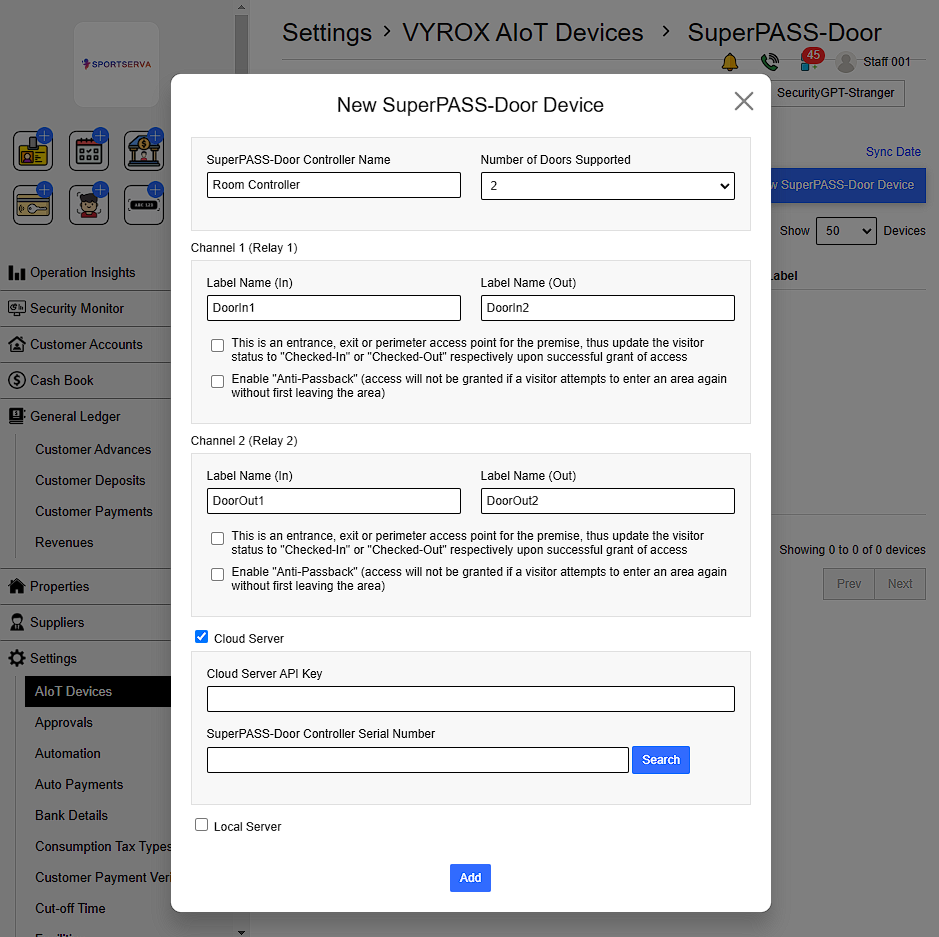 |
Details include:
- SuperPASS-Door Controller Name
- Number of Door Supported (No of Channel = No of Door)
- Label Name of each channel (In & Out)
- Cloud Server
For each Channel/ Door Supported Management can choose to enable :
- The door as an entrance, exit, or perimeter access point for the premises. This means , upon successful access, the visitor status will be updated to “Checked-In” or “Checked-Out” accordingly.
- The “Anti-Passback” feature .This prevents access if a visitor attempts to re-enter an area without first leaving.
For the cloud server :
- Cloud Server API Key is taken from : Server
- SuperPASS-Door Controller Serial Number : Door access application
If Search shows X mark . This means the server cannot find the Controller.
 |
To fix it :
- Check Serial Number
- Check Ports and IP
- Use Debug Tools
Once controller is detected , Search will show green tick mark.
 |
Click Add when finish .
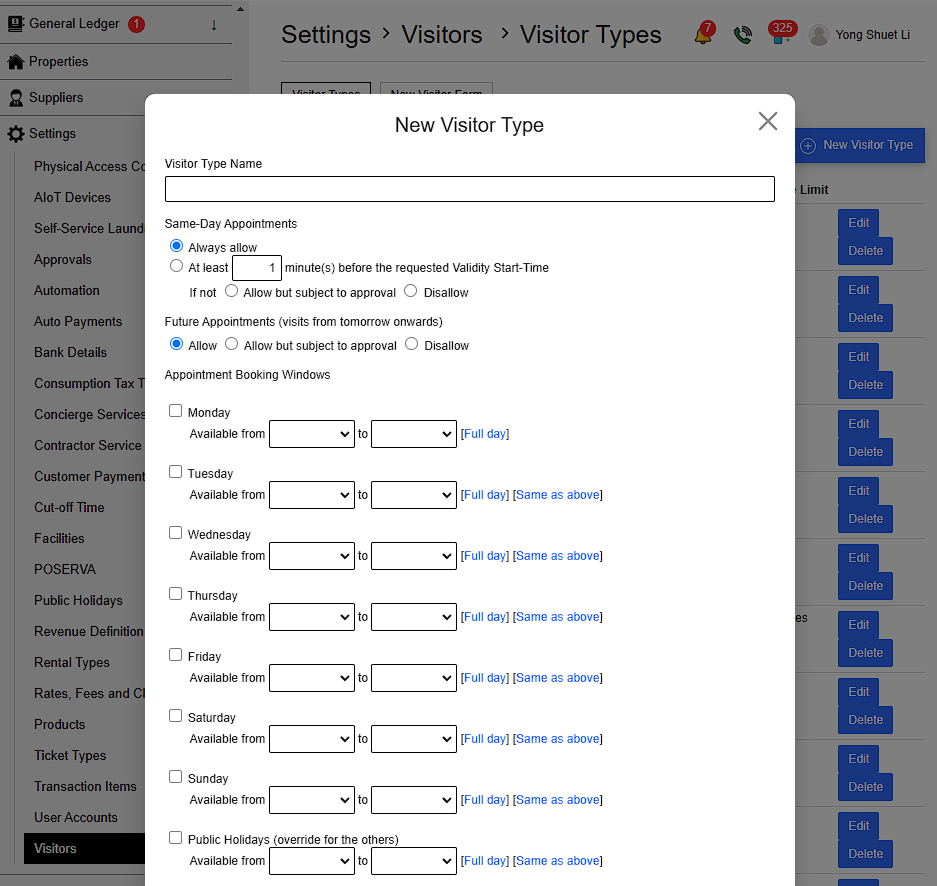
2.2. Add New Visitor Type
Go to Settings > Visitor > Visitor Types > New Visitor Type > Fill in details > Add
Fill in the Required Details:
1) Visitor Type Name
2) Same-Day Appointments:
- Always Allow: Enable same-day appointment scheduling.
- Minimum Lead Time: Specify the minimum number of minutes required before the requested Validity Start-Time.
- Disallow: If same-day appointments are not allowed, choose to either: Allow but require approval or Disallow it entirely.
3) Future Appointments:
- Decide if visitors can schedule appointments for future dates (from the next day onward).
4) Appointment Booking Windows :
- Set When the visitor type can be requested
 |
5) Visitor Pass Validity :
- Set the duration for which the visitor pass will remain valid after approval.
Management can choose between:
- Fixed to: The pass will valid for set amount of time after the approval
- Until: The pass will valid until the set time of the day
6) Early Check-In
- Decide whether to allow visitor to use pass before appointment time
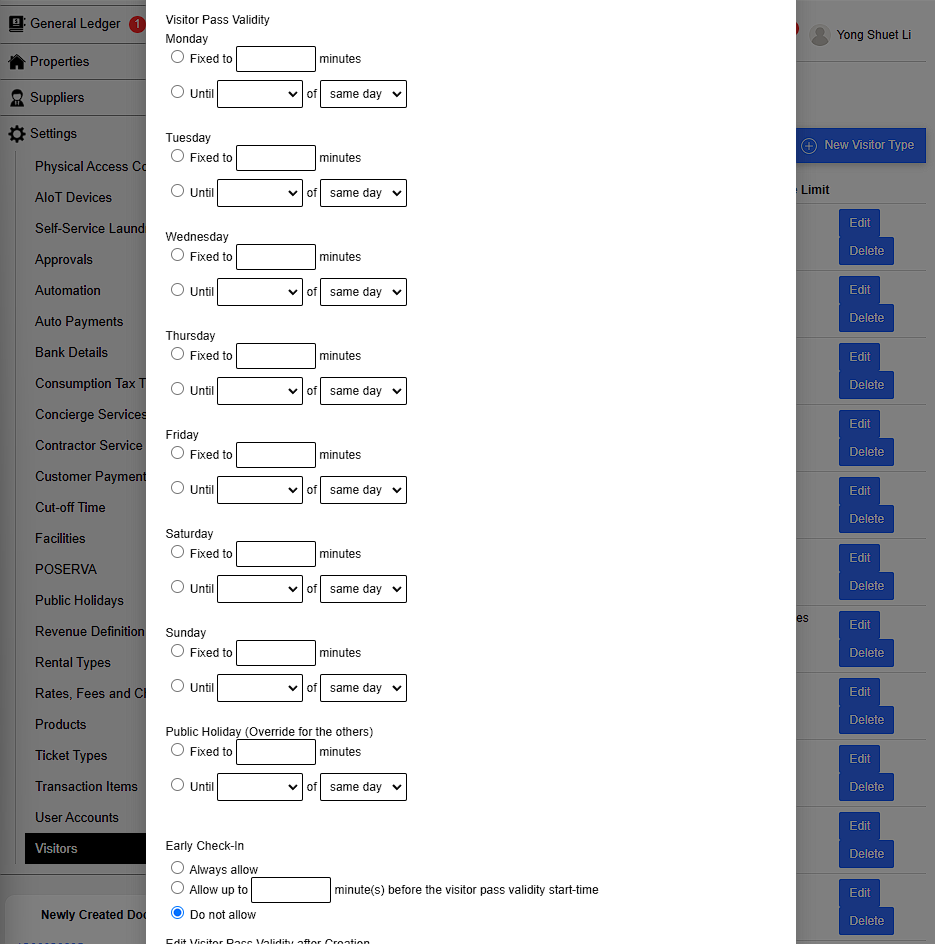 |
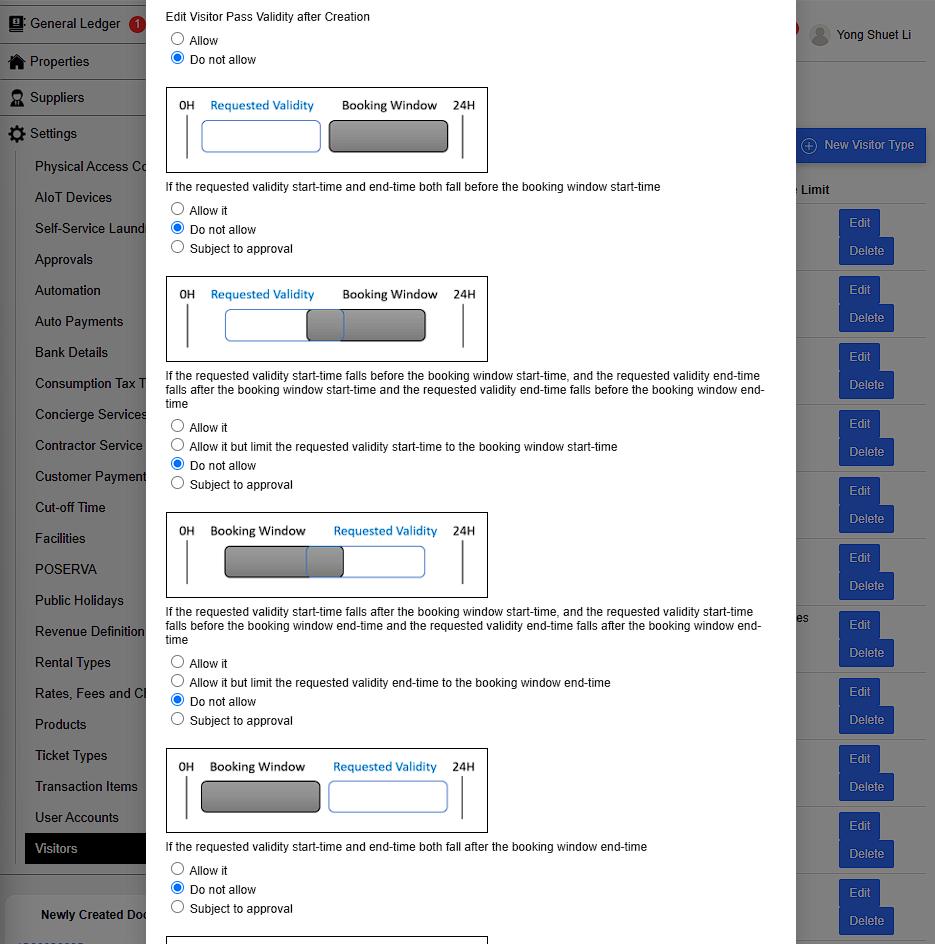
7) Edit Visitor Pass Validity after Creation :
- Decide whether to allow visitor to change visitor pass validity after creation.
Difference: Booking Window vs. Visitor Pass Requested
| Booking Window |
|---|
| Booking window is the designated time range within which visitor passes are generally valid and prioritized. |
| Visitor Pass Requested |
| Visitor pass requested refers to the start & end times that the user (visitor) is asking for their pass to be valid. |
8) If the requested pass validity :
- Start and end times are before the booking window starts.
Example:
- Booking Window: 12:00 PM to 2:00 PM
- Visitor Pass Requested: 6:00 AM to 7:00 AM
Options:
- Allow: Allow visitor pass to be created
- Do not Allow: Prohibit visitor pass to be created
- Subject to approval: Need approval before pass creation
9) If the requested pass validity :
- Start time is before the booking window start time.
- End time is during the booking window .
Example:
- Booking Window: 12:00 PM to 2:00 PM
- Visitor Pass Requested: 11:30 AM to 12:30 PM
Options:
- Allow: Allow visitor pass to be created
- Allow but limit requested validity start time to the booking window start time: Pass created is the booking window time.The pass is created from 12:00 PM to 12:30 PM.
- Do not allow: Prohibit visitor pass to be created
- Subject to approval: Need approval before creation
10) If the requested pass validity :
- Start time is during the booking window .
- End time is after the booking window end time.
Example:
- Booking Window: 12:00 PM to 2:00 PM
- Visitor Pass Requested: 1:30 PM to 2:30 PM
Options:
- Allow: Allow visitor pass to be created
- Allow but limit requested validity end time to the booking window start time: Pass created end time match the booking window end time. The pass is created from 1:30 PM to 2:00 PM.
- Do not allow: Prohibit visitor pass to be created
- Subject to approval: Need approval before creation
11) If the requested pass validity :
- Start and end times are after the booking window ends.
Example:
- Booking Window: 12:00 PM to 2:00 PM
- Visitor Pass Requested: 3:00 PM to 4:00 PM
Options:
- Allow: Allow visitor pass to be created
- Do not allow: Prohibit visitor pass to be created
- Subject to approval: Need approval before pass creation
 |
12) If the requested pass validity :
- Start time is before the booking window start time.
- End time is after the booking window end time.
Example:
- Booking Window: 12:00 PM to 2:00 PM
- Visitor Pass Requested: 11:00 AM to 3:00 PM
Options:
- Allow: Allow visitor pass to be created
- Allow but limit the request validity start-time and end time to the respective booking window accordingly: Pass created is the booking window time. The pass is valid from 12:00 PM to 2:00 PM.
- Do not allow: Prohibit visitor pass to be created
- Subject to approval: Need approval before pass creation
13) Grace Period
- Allow a number of minutes grace period after a visitor pass has expired , during which the visitor may still be granted access through the access controls.
14) Expired Visitor Pass Extension
- For visitors without an approved Contractor Service Permit or Facility Booking
- Allow a number of minutes extension if requested within a number of minutes after validity end-time.
15) QR Key Time Limit
- Use Dynamic QR code and refresh it every few seconds or use static QR code
16) QR Key Usage Limit
- Limit the number of times the QR key is used
17) Check In Requirements for Pre-Registered Visitors
- Identity verification is needed or not at guard house upon arrival
- If needed Visitor let guard scan QR code provided for express identity verification process
- If not needed, Visitor scan QR key provided at QR readers and access to premise directly
18) SuperPASS-Door Access Control
- Decide which door this visitor type can use
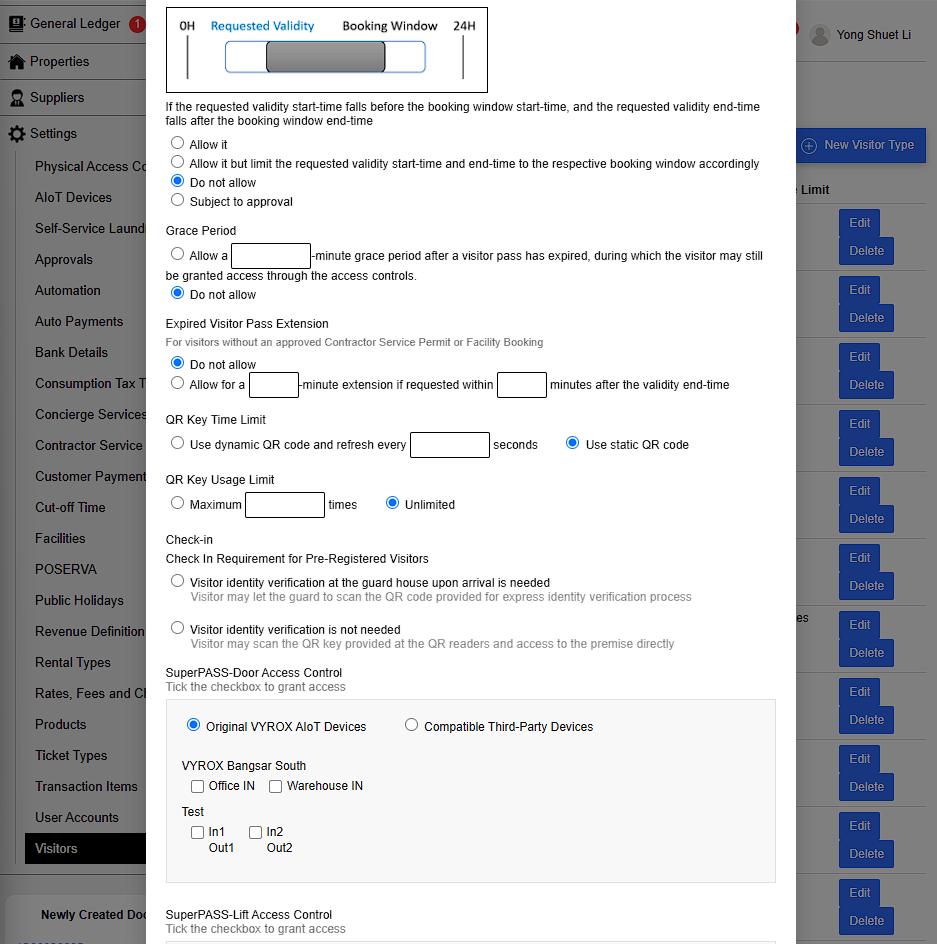 |
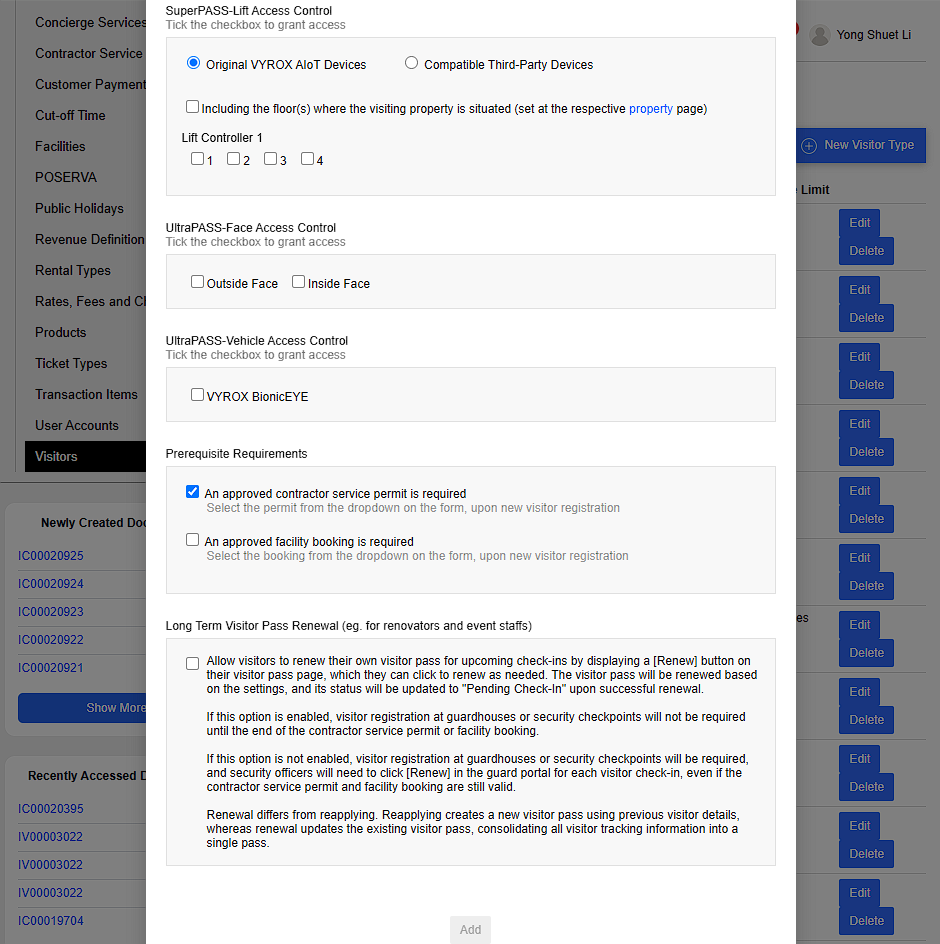
19) SuperPASS-Lift Access Control
- Decide which lift this visitor type can use
20) UltraPASS-Face Access Control
- Decide outside or Inside Face Access
22) UltraPASS-Vehicle Access Control
- Decide whether to use VYROX BionicEYE for Vehicle Access
22) Prerequisite Requirements
- Require approved contractor service permit or Facility booking.
- Both permit and booking is selected from dropdown on form , upon new visitor registration
23) Long Term Visitor Pass Renewal
Simplifies the process for visitors who frequently need access, such as renovators or event staff, by allowing them to renew their existing visitor pass for future check-ins.
Self-Renewal :
- Visitors can click the [Renew] button on their Visitor Pass Page to renew their pass.
- Once renewed, the pass will retain its settings and show the status “Pending Check-In.”
How It Works
a. If option is Enabled:
- Seamless Check-In : Visitors do not need to register again at guardhouses or security checkpoints during the validity period of their contractor service permit or facility booking.
b. If option is Disabled:
- Manual Check-In: Visitors must register at guardhouses or checkpoints for every check-in.
- Security officers need to manually click [Renew] in the guard portal for each visitor, even if permits or bookings are still valid.
Difference: Renewal vs. Reapplying
| Renewal | Reapplying |
|---|---|
| Updates the existing visitor pass. | Creates a brand-new visitor pass. |
| Consolidates all visitor tracking information into a single pass | Uses previous visitor details but starts fresh. |
 |
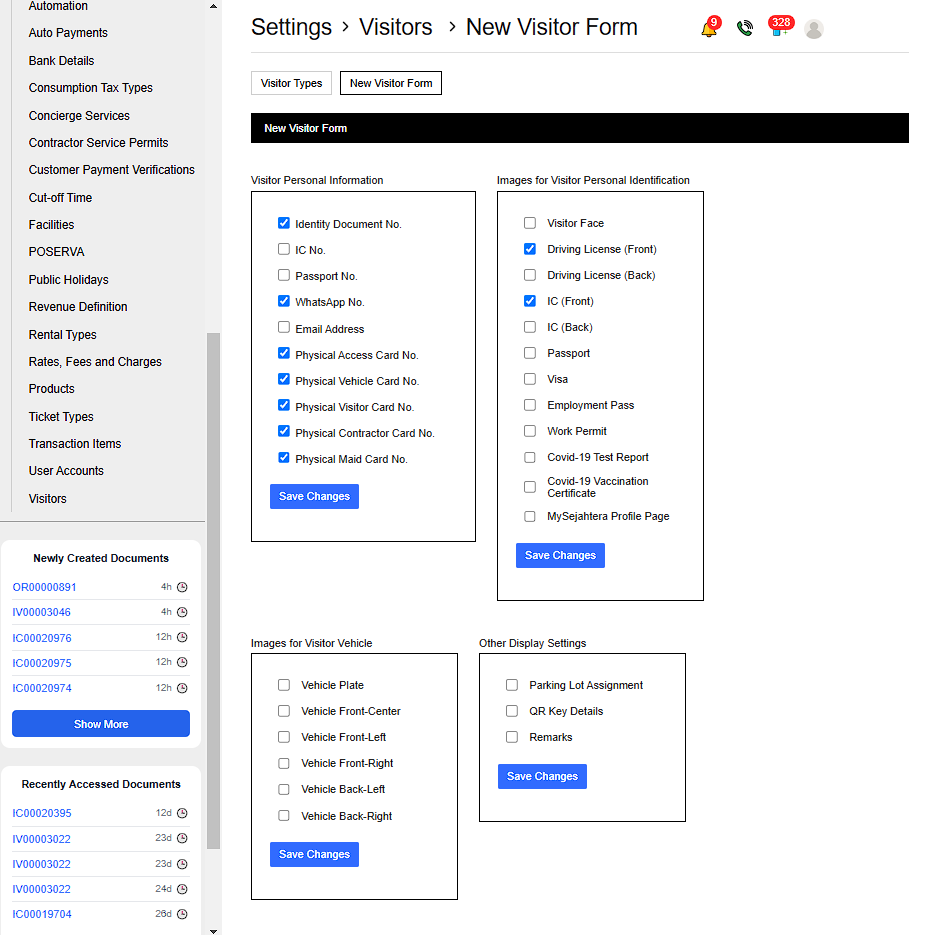
2.3. Edit New Visitor Form
Go to Settings > Visitor > New Visitor Form > Edit visitor form
Catagories to edit visitor form
- Visitor Personal information
- Images for Visitor Personal Identification
- Images for Visitor Vehicle
- Other Display Settings
 |
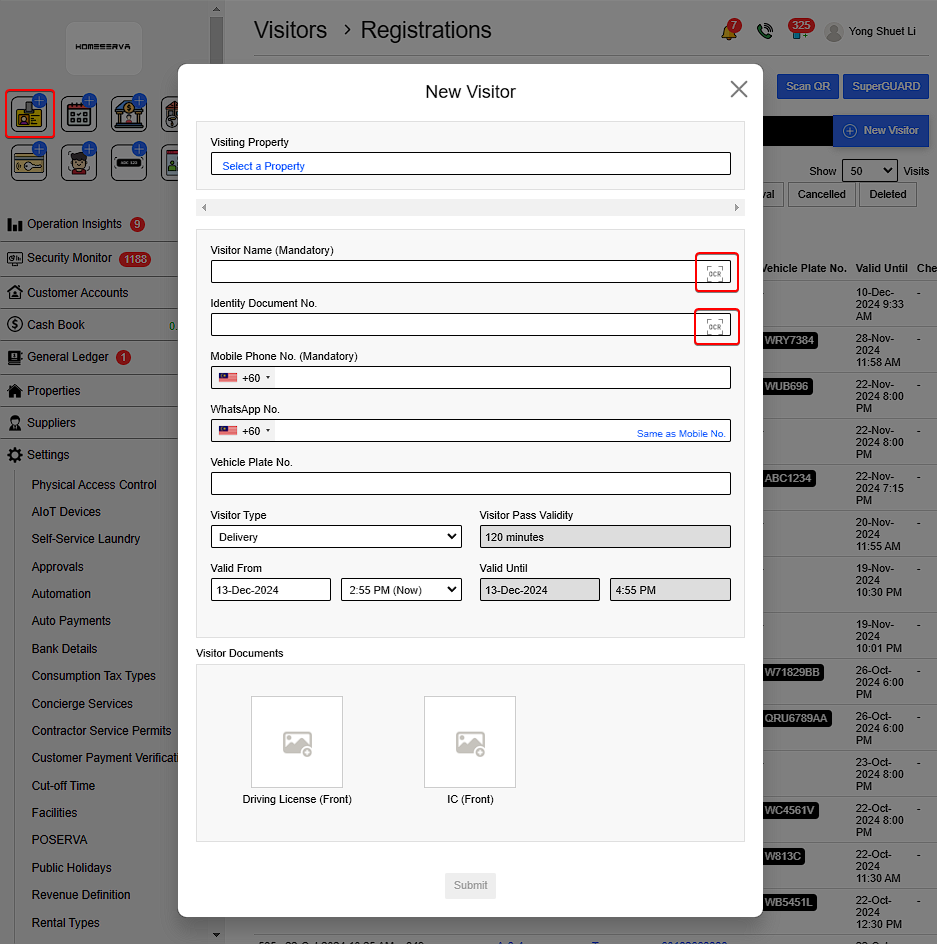
2.4. Add New Visitor
Go Visitor > Select a Property > OK > Fill in details for New Visitor > Submit
Details include:
- Visitor Name
- Identity Document (Driving License or MyKad)
- Phone number
- Vehicle Plate
- Visitor Type ( Such as : Visitor , Delivery , Contractor)
- Visitor Valid time
- Visitor Driving license and IC picture
Both name and IC can be filled in automatically using the scan feature .
 |
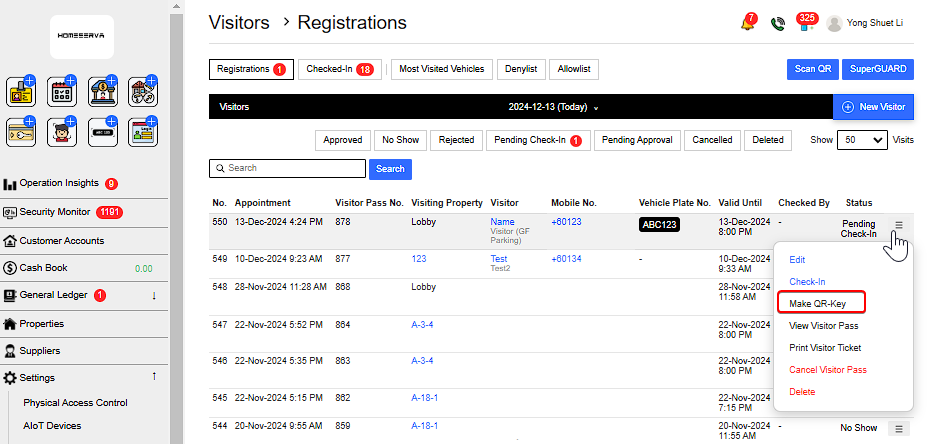
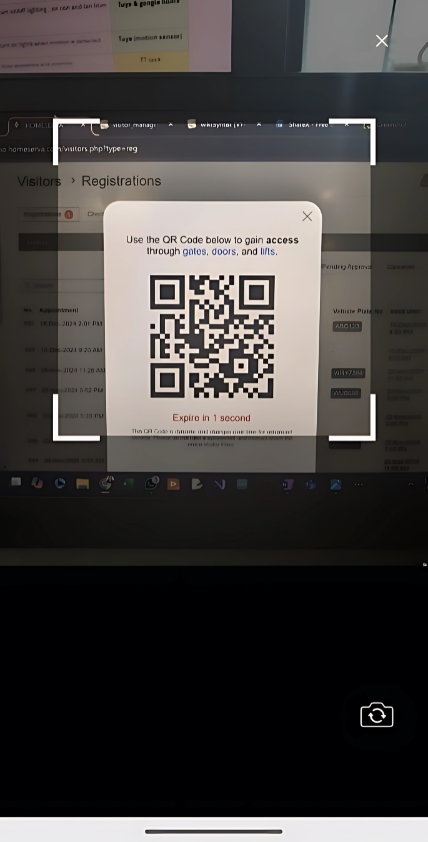
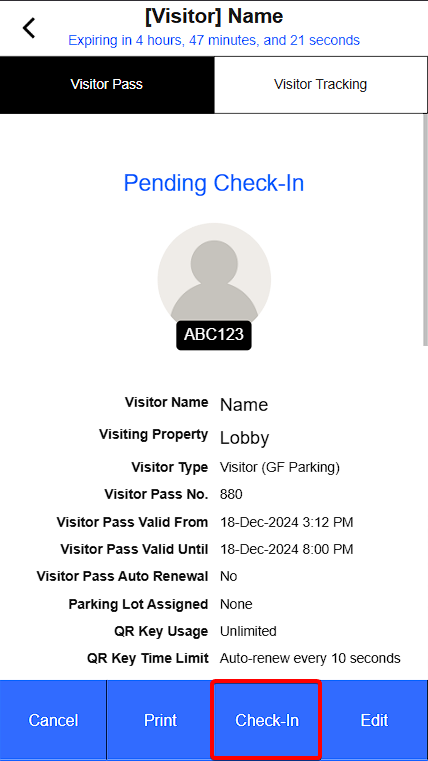
2.5. Share QR code to Visitor
After new visitor registration is made , go to more options > Make QR-Key
 |
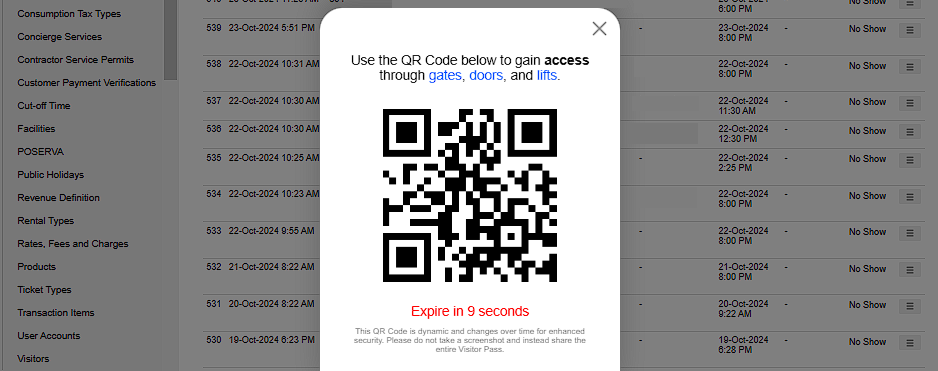 |
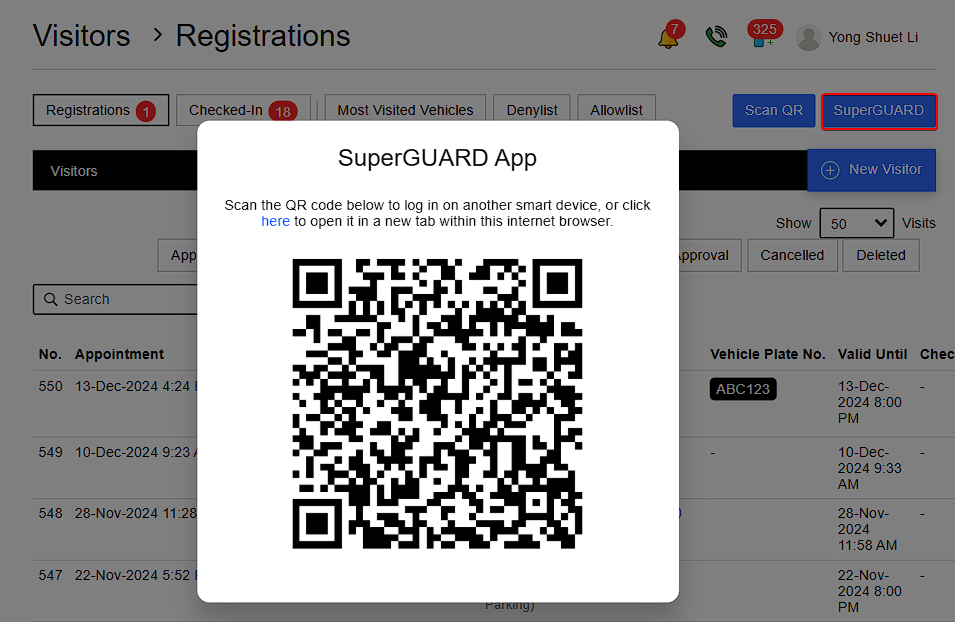
With the QR-key Guards will go to SUPERGUARD > Scan QR code/click here > Visitor > Scan QR > Check-In
 |
 |
 |
 |
 |
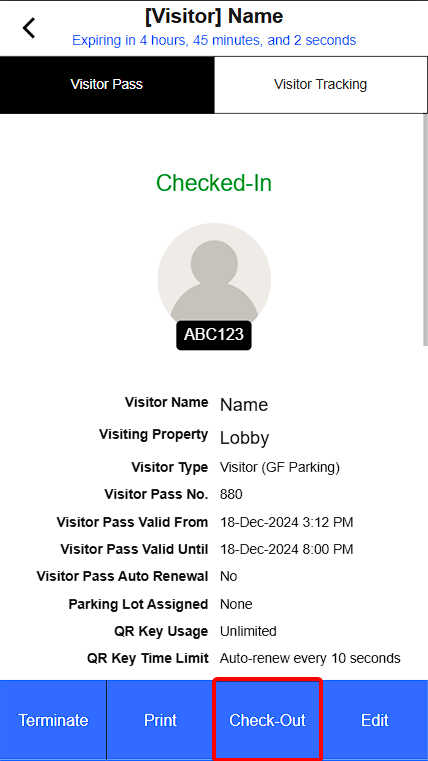
To Check-Out repeat Scan QR code process .
 |
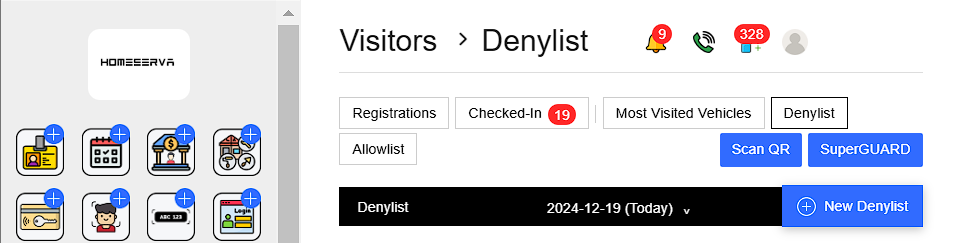
2.6. Denylist & Allowlist
Go to Visitor and ontop of the page there are visitor registered , check in , most visited vehicle , Denylist & Allowlist.
Visitor registered , Check in & Most Visited Vehicle
- Help streamline and track visitor the registered, check in and vehicle that check in the most for security and surveillance.
Denylist & Allowlist
- To streamline access control.
- Denylist : Individuals on the denylist are permanently restricted from entering the building.
- Allowlist : Individuals on the allowlist have permanent access and can enter using their QR codes.
 |
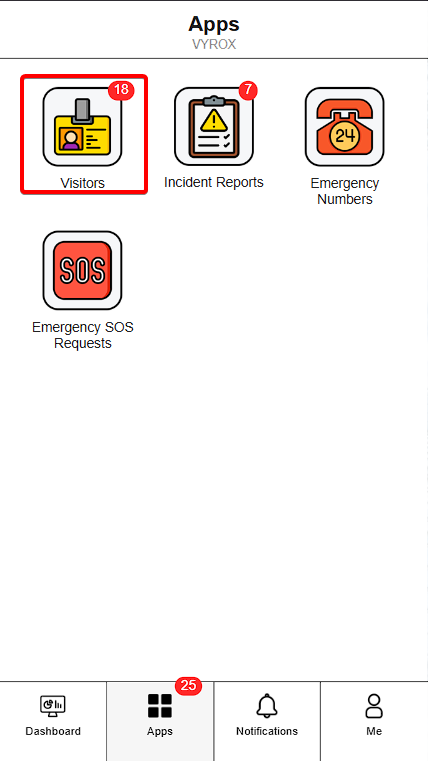
3. Visitor Management : Guard portal
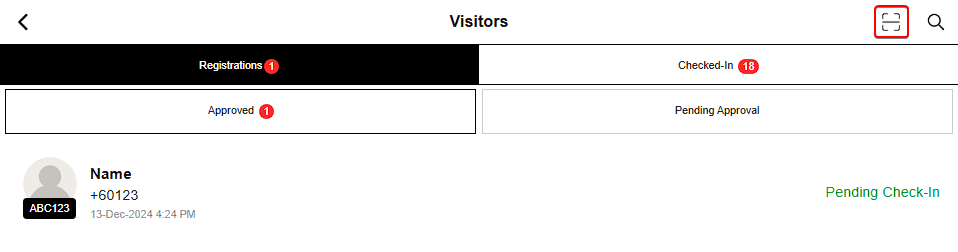
3.1. Visitors
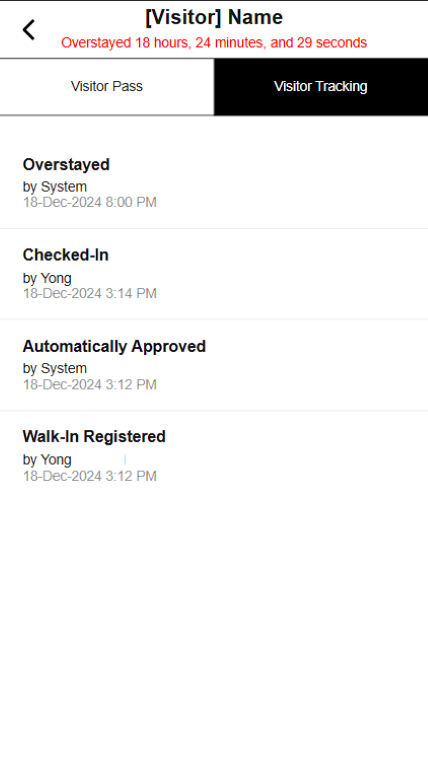
Guard can see the status of all visitor pass, such as visitor that check in, check out , No show , canacelled and overstayed .
 |
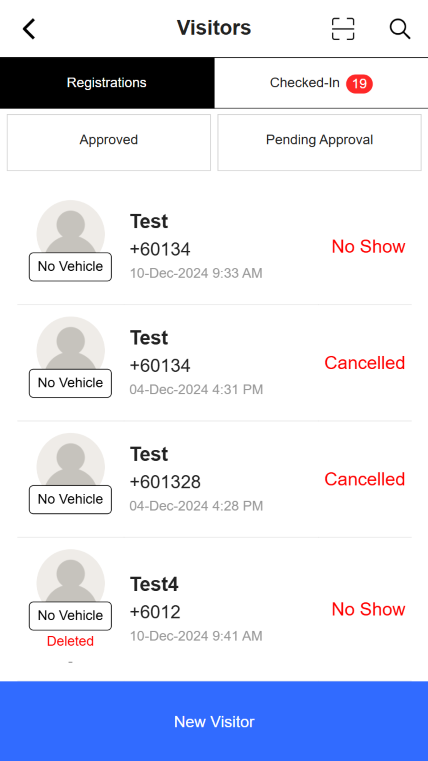 |
Guard can also track visitor check in chcek out activity for securrity purposes.
 |
The same applies in the admin account but admin account has more detail features.
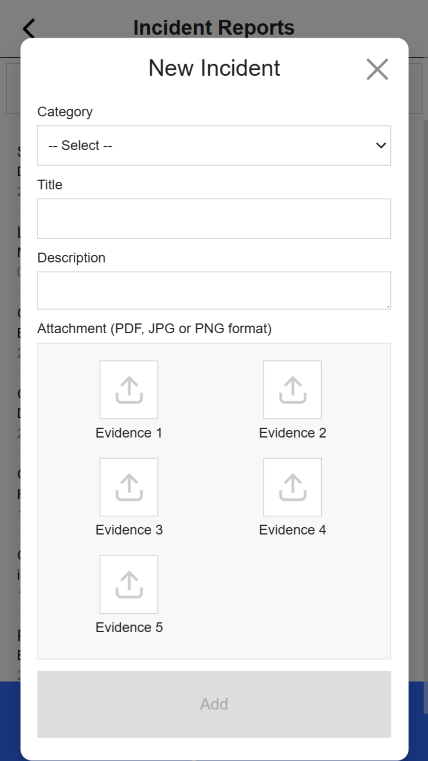
3.2. Incident Reports
Guards and residents can use the app to report incidents such as equipment malfunctions or notify about injured individuals nearby. This ensures management stays informed, updated, and ready to address issues promptly.
To Report an incident :
Go to Incident Reports > New Incident > Fill in details
Details include :
- Catagory
- Title
- Description
- Attactment eveidence
|  |
|