Table of Contents
9. Settings Panel (General)
9.1. Displaying your company logo on receipt
- Click “Choose File” to select picture file in your local computer.
- Click “Submit” to upload logo file into server.
- Remember to click “Update” to save this setting.
- If your logo is not shown on this page, right click your mouse to reload or refresh this page.
9.2. Setting business start time
- Select your business start time.
- Remember to click “Update” button to save this setting.
Effect:
- When you select 10:00:00 am (January 1st, 2011) as your business start time, sales from 11:59:59 pm
(January 1st, 2011) to 9:59:59 (January 2nd, 2011) are still considered as sales on January 1st, 2011.
9.3. Settings number of records shown on records panel
- Key in number only in the textbox.
- Remember to click “Update” button to save this setting.
9.4. Saving customer name in the system
- Click the small box to tick “Required Customer Name” option.
- Remember to click “Update” button to save this setting.
Effect:
 |
9.5. Settings automatically print receipt once checkout
- Click the small box to tick “Auto Print When Stop” option.
- Remember to click “Update” button to save this setting.
Effect:
- Pop up printing option once stop button is clicked.
 |
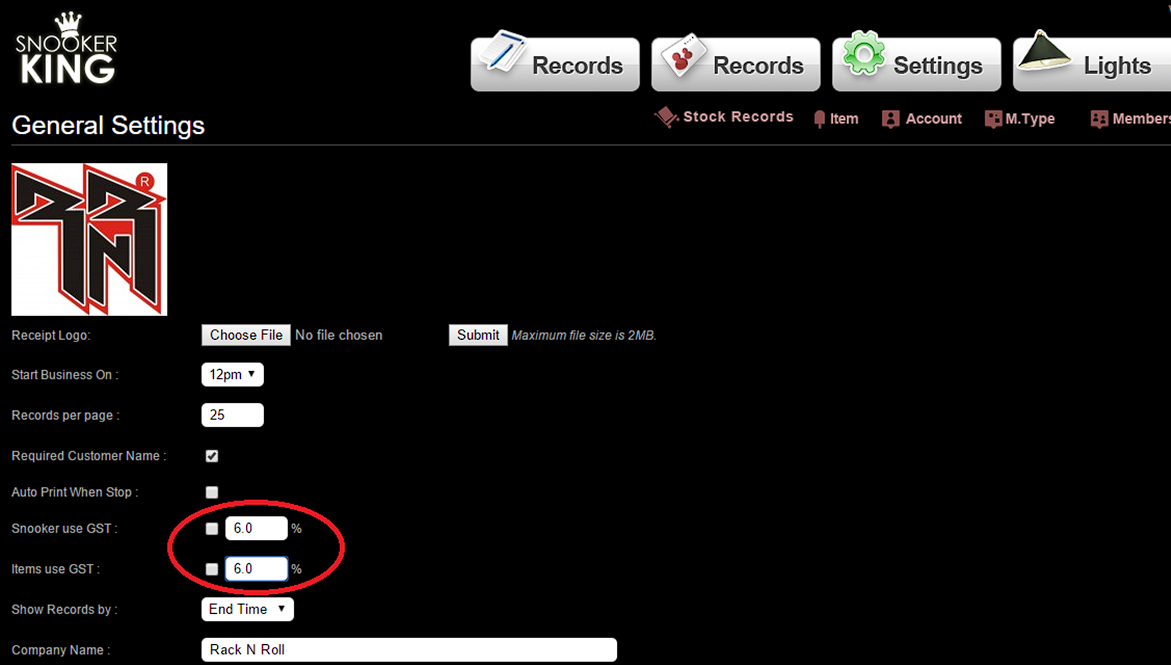
9.6. Settings Government Tax GST
- Click the small box to tick “Snooker Use GST” and “Item Use GST“.
- Enter the percentage of GST.
- Remember to click “Update” button to save this setting.
 |
9.7. Displaying records based on end time or start time of each game
- Select “End Time” or “Start Time” option in “Show Records by”
- Remember to click “Update” button to save this setting
Effect:
- Customer plays snooker from 11:30:00 pm (January 1st, 2011) to 12:30:00 am (January 2nd, 2011).
- Checkout time is 12:30:00 am.
- When user selects “End Time” option, this games record is assigned as records on 11:30:00 pm (January 1st, 2011).
- When user selects “Start Time” option, this games record is assigned as records on 12:30:00 am (January 2nd, 2011).
9.8. Displaying your company information in the receipt
- Key in your company information in the textbox for Company Name, Company Address, Company Email and Company Tel No.
- Remember to click “Update” button to save this setting.
9.9. Changing the font size and body size of receipt
- Key in your desired number in textbox of Receipt front size, Receipt total amount font size, Receipt width, Receipt row spacing and Receipt logo width.
- Remember to click “Update” button to save this setting.
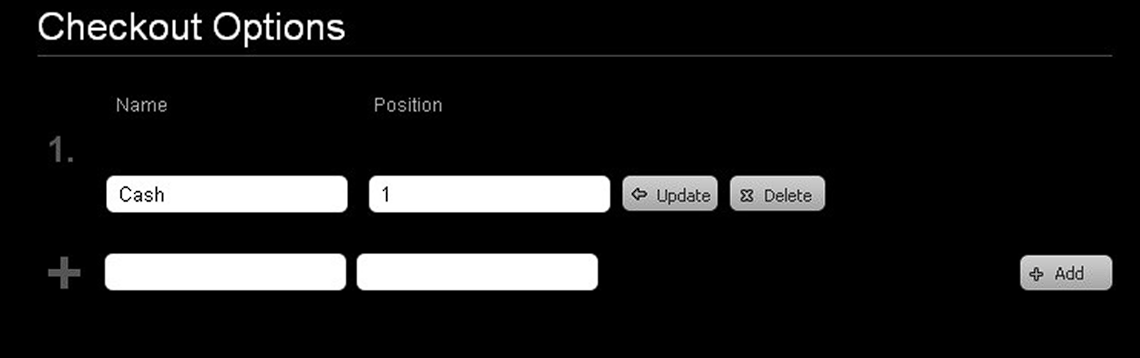
9.10. Setting up the payment types when checkout
- Key in payment type in name column and position column.
- Click “Add” button to add the payment type.
- Name: Name of payment type
- Position: key in number 1, 2, 3, etc…… to position each payment type
- Payment type with Position 1 will be selected automatically when clicking “STOP” button in checkout panel.
 |